Back in the 1960s and '70s I collected records of some of my favorite artists, many of them while stationed in Korea. Back in that day, I recorded the vinyl platters to reel-to-reel tape as masters, then to cassette for daily listening. In recent years, the rubber belt drives in my cassette drives have deteriorated, and I wanted to preserve the wonderful music of the Pearl Sisters, Moon Jeong Seon, Kim Boo Ja, Chicago and the Free Design to something of higher quality, namely Compact Disc.
Having converted my 'x86 computers completely to Linux in the late 1990s, identifying, locating and loading appropriate software for this task was the first problem. Most of the available software is MSWindows-oriented and did not address my needs. This document is my way of thanking the many software authors who made the programs I use, and of trying to assist anyone wishing to walk down the same road. While earlier versions of this page detailed steps needed for Turbolinux which I used for many years, My conversion to Ubuntu (Dapper Drake, 6.06 and Feisty Fawn, 7.04) is now complete, and the data here is for that release. Upgrades on some of my systems seem to confirm that Feisty Fawn (7.04) should also be compatible with these steps.
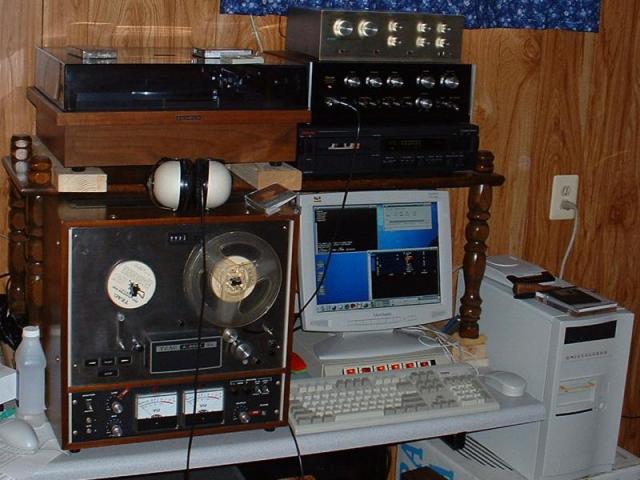
Most of my equipment, as well as the music being processed dates from the late 1960s and early 1970s. The computer is the major exception. The unit in the photo was an AMD K6-2/500 which was adequate for most tasks, but really bogged down on heavy number crunching such as denoising tracks and has since been upgraded to a 1.5 GHz Athlon. For serious work, I would recommend an Athlon operating at a clock rate of at least 1.2 GHz. Here is my setup a few years as it captured a Moon Jeong Seon cassette using Gnome Recorder in my old Turbolinux 10 Desktop:
The major items of equipment are:
The bottle of alchohol on the left of the tape deck is for cleaning the heads and drive wheels of the tape and cassette decks frequently when recording from those media. Not shown are a pair of Wharfedale Achromatic Systems speakers (for my listening enjoyment). All equipment except for the PAS-1 Preamp (more on this later) are connected to the Sansui Amplifier which becomes the central hub. The easiest way to make connections is with shielded cable terminated in the standard RCA Phono jacks. Two adapters from a male miniature stereo plug to two female RCA connectors (for Left and Right channels) will be needed for most sound cards at the computer end. Connect the equipment as:
Using the Stereo Amplifier as a central audio hub allows me to monitor the source of recordings as they are made, and to listen to all of the source devices by switching at the amplifier as normal when listening to recordings. It also allows me to play music from the computer via XMMS (my favorite music program) with its various sources, or music CDs from the CD drive in the computer. I highly recommend that you use a computer with a CD or DVD recorder in it to backup any captured sources. More on this later when we discuss procedures.
When connecting the equipment, try to keep the audio cables as far away from power cords as possible. If they must cross, try to do so at a 90- degree angle. Also, if your monitor is close to the audio equipment as you see in the picture of my setup, use an LCD display instead of a CRT since the latter creates strong magnetic fields which can add noise to your sound. This is from the "school of hard knocks" since I had a Sony CPD-1304 CRT monitor where the Viewsonic LCD currently sits, and could not capture a clean recording because of the induced noise coming from the monitor.
Time out for a detour. In the equipment list above is an old vacuum tube preamp, the Dynakit PAS-1. It was needed to process one album in my collection which was apparently made with 78 rpm pre-emphasis since when played at the normal 33 1/3 rpm with the Sansui phono preamp (set for 33 1/3 rpm LPs) it sounded as if there were no high-frequency components at all. Even the Sansui preamp's treble boost at its maximum +10 dB gain was not sufficient to make the cuts sound good. The PAS-1 (which I assembled in the 1960's while in college) was pressed into service and the 78 rpm phono setting produced good results. Kim Serena is now listenable.

The type of sound card in the computer will make all the difference in the quality of music as a result of your efforts. I tried, and replaced, all of my ISA sound cards (Yamaha OPL3, SoundBlaster 64AWE, ES1868, Crystal cheapie), and started with an Ensoniq ES-1370 AudioDrive PCI card. Later, I upgraded to an Ensoniq ES-1371 AudioDrive PCI which had a better dynamic range and lower noise figure. I currently use a Creative PCI Live (the one using the emu10k1 driver) which is the best of all I have tried to date. I have tried both the Creative SBLive24 (which apparently has no record ability) and Audigy LS as well as several on-board sound systems with no improvement over the current interface.
The base software load for the Sound Processing computer is currently Ubuntu 6.06 (Dapper Drake) workstation install with all updates. Several software packages which are not included in the base Ubuntu workstation are needed, but all are available from the Ubuntu repositories. The basic one to record and perform manual editing of files is audacity. Start by installing this package with either the synaptic GUI package tool or froma terminal with:
If you have not captured audio with your system before, you may need to adjust many levels within the Alsa system. The easiest way I have found is to start a source playing into the "Line-In" on your sound card, open Audacity (selecting it from the menu Applications -> Sound and Video -> Audacity) and configure it for recording from the "line" input (left mouse button press with the cursor on the device button next to the volume slider with the microphone symbol). Next, in a terminal, enter "alsamixer". This brings up a mixer where you can activate and adjust basic levels. Since some cards (definitely the ES-1371 and PCILive) have an internal amplifier stage that will clip the audio if mal-adjusted. The goal is to set levels so that no clipping occurs when the signal levels reach, or are near, the maximum levels. This will preserve the dynamic range of the original piece for the best quality.
For automatic removal of "pops" and "clicks" from old vinyl, the best tool that I have found is Gnome Wave Cleaner (gwc). This can be added online by using the Synaptic package manager, or from a terminal with:
Before discussing the exact packages needed, you should decide what file formats you want to use. After working on this project for a couple of years, I have settled on:
There are a few utility programs that are useful in processing the captured sound. They can all be loaded from the Ubuntu repositories with the Synaptic package manager, or from a terminal with:
We will use these tools later in the processing and converting selections to different formats.
The first stage is to familiarize yourself with the capture tools and configure your equipment. I use Audacity to capture the audio source and the default Alsa sound system. An important part of this task is to have the levels into the sound card set as high as possible without clipping the sound which causes distortion and limits dynamic range. When first setting up a system, or changing audio cards, I keep a terminal open with "alsamixer" running in it. Insure that the source of your audio (Line-In if your system is set as I listed above) is set as the Recording source in the mixer. Some cards, such as the ES-1371, have an "IGain" setting for an internal amplifier. If the IGain level is too high (above 33% with my ES-1371) then the signal will be clipped. As a suggestion, try recording a selection, and watch the waveform displayed in Audacity for signs of clipping. What you want is for the loudest sounds such as cymbal crashed and crescendos to peak at the maximum amplitude. For badly scratched records, let the noise spikes clip since you will remove those in post-recording processing.
For the rest of this discussion, I will describe the steps I use to process Long-Play (LP) vinyl records. The steps are simpler for 45 rpm records since they only have one song per side, and tape (reel-to-reel or cassette) generally do not need to be processed for "pops" and "clicks" but only for "hiss".
When preliminary adjustments are complete, record an entire side of the LP. Try to start the recording as early as possible, and record several seconds after the last cut ends. This provides clear sections which will be used as a noise source during the "hiss" removal phase. If you use the "sound recorder" in Gnome, save the resulting file in a distinctive name. I use the album number with a suffixed "a" and "b" for the first and second sides. The two files (e.g. "kst2a.wav" and "kst2b.wav") may then be recorded to a CD as either data, after making an ISO9660 image (I recommend this), or as a two-track audio CD. Keep this as a master for later processing if needed, since it reduces the need to play the records again (each play degrades them more).
Next, separate each side into distinct track files for processing. Doing it in this manner as opposed to cleaning an entire side, then dividing into the constituent tracks, seems to provide better results since the quality (as well as type and amount of noise) varies somewhat between the outer and inner tracks. Separation of tracks is easily performed with either gwc or Audacity. Open one of the files, highlight one track (including all of the beginning and ending "silence"), then "Export selection as WAV" (Audacity) or "Save Selection As.." (gwc) and give it a distinctive name. I usually start side 1 tracks with "trk01.wav", and side 2 offset by a constant number such as 10 resulting in "trk11.wav" for the first track on side 2. Be sure that you add the beginning and ending silence to each track (most of them are therefore used twice) for the best samples, and as a guage for how the quality and noise varies on the vinyl surface.
When all tracks have been separated, you are ready to begin cleaning each selection. For most records, using the automated method with "gwc" produces satisfactory results, and you may do all the processing with just the one program. The first step is to remove clicks for which two settings are available. I have found the best results by using the basic setting for general use, and only using the "Remove Softer Click" setting when absolutely necessary, since many artifacts result from the severe processing of the file. Hiss removal is a difficult area to do without creating additional noise "artifacts". The level of hiss removal is adjustable via a slider in "Audacity", and by a Setting in "gwc". If you are just starting in this area, I would suggest that you start a very low removal setting, and increase if needed, but prepare to use "undo" frequently. Read the built-in help which is coming along nicely in gwc-0.20-07. At every step, listen to the processed music after major steps. I have found that "gwc" responds very badly to some saxophone music, and the results will be completely unlistenable if you do not pay attention. You can declick around troublesome areas with caution. When you have completed the click removal, proceed to hiss removal and level adjustment.
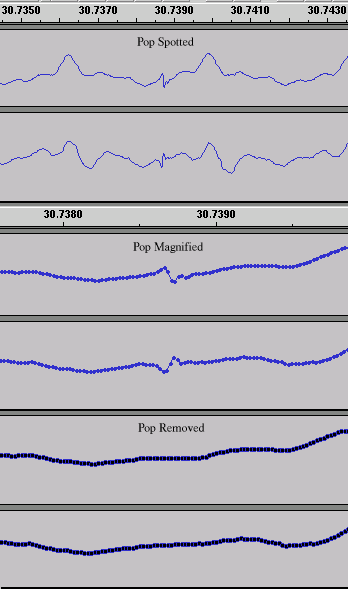
If you are a real glutton for punishment, or have a perfectionist streak, you can devote the rest of your life to manual click removal with Audacity. When I began this process, It took 6 weeks of evenings and weekends to process five tracks (Side B of KLS-55), but Kim Choo Ja hasn't sounded this good in a LONG time! Begin by loading a file into Audacity, and zoom in to the point where the lines of the waveform appear as separate dots. At this range, you are looking at a depiction of each of the distinct samples in the digital waveform (44,100 samples-per-second on each of the two channels). At this resolution, it is difficult to spot abnormalities such as "clicks", so I usually zoom out by two clicks. When you spot something suspicious, zoom in two clicks, move the dots to erase the "click", and zoom back out to scan for more. Here is a sample in a relatively quiet passage (they aren't all this easy ;-)
Be sure to remove the noticeable clicks in the "quiet" areas at the beginning and end as well, but leave the small residue since it will provide the sample for "hiss" removal. If you wish to listen for "clicks" and zoom in to locate them, I suggest you use headphones and turn up the treble on the amplifier. This will make the high-frequency noise spikes more pronounced.
After the clicks, pops and ticks are removed by whatever method, you may now begin the final processing steps. I suggest Audacity for the remainder of processing. Zoom in to the beginning of the piece, and highlight the beginning (index 0) to where the first note begins. Listen with headphones to be sure, then back the ending of the selection area away from the start by about 0.4 seconds (there is a seconds counter at the bottom of Audacity's window). Cut the selection, then move to the end of the file, and paste the noise there. If you are lucky or skillful, the ending and beginning noise samples will mate and provide a longer sample to use over the selection. Listen to the (now) longer noise selection at the end, and cut any parts that obviously do not belong, such as pieces of the next or previous song. Next, listen to the trailing note and mark when it has totally faded out and highlight from that point to the end of the noise selection. Listen to it again to be sure that there is no music there, then with it highlighted, select "Effect->Remove Noise" and click on Step 1, "Get Noise Profile". Then highlight the entire Track (you can leave some noise at the end if you wish), select "Effect->Remove Noise" and move the slider bar to the left end (Less) in Step 2. With headphones, listen to the first few seconds in "Preview" and note any artifacts. You can increase the level of noise removal with the slider, but I have never moved the slider more than a small fraction of the way above "Less" without significant distortion to the music.
The final processing step involves adjusting levels and consists of two parts. The first (continuing from the noise removal above in Audacity) is to select the envelope tool. Increase the overall amplitude until the strongest level (plus or minus of either channel) is almost at the edge, or no more adjustment can be made. Then zoom in on the beginning, and set a volume taper from 0 at the beginning to full-scale at the first note, 1/2 second in (from the noise clipping above). Likewise, move to the rear of the file and set an ending point. I have found that one second of silence after the last note fades out provides a comfortable separator between songs when played from a playlist, and CDs can add only one second between cuts to comply with the 2-second separation requirements of CD-DA. Cut any unneeded dead time at the end, and taper the final 1.5 seconds to provide whatever ending effect you desire. Occasionally, the button to add silence comes in handy to remove artifacts in the leadin and leadout "quiet" areas.
When you are happy with the sound (as played from within Audacity), Export the entire song as WAV. The final level adjusts to the file will be done with "normalize-audio" from a terminal. To see what the average and peak levels of a file are, we use a command-line tool (with "trk01.wav as an example file) invoked as:
I like to have the songs at a relatively high level without clipping, and have found a comfortable level to be 0.1 dB below full scale, but an average level of -10 to -12 dBFS (decibels below Full Scale). Many newer CDs clip peaks and crank the average level up to -7 to -9 dBFS. Wherever you are comfortable, try to keep the tracks on a CD (or your entire database) within a narrow range, or some songs will be too soft while others blare out.
There is a default level (-12dBFS) for the average amplitude level in the program version available from the Ubuntu repositories. If you do not specify an amplitude, this default will be used. In this way, all songs will have the same average level and sound roughly as if they are at the same level, but the peak amplitudes (such as drums beats, cymbal crashes, etc) will be higher and clipped if necessary to keep them below 0dBFS.
If you want to retain the complete dynamic range of the original file, but increase the amplitude to the maximum without clipping, different options are used. I recommend reducing the peak level a tad (1/10th dB) which seems to allow a slight pad and keep the D/A convertors happier. You cannot use single commands for this, so a two-step process is used. This appears as (using trk01.wav as a sample file):
You may now give the file a final name, convert to other formats, add metadata, or just sit back and listen.....
As mentioned earlier, there are several formats you might use for storage or to play in various units. If you followed the above processing steps, you now have .WAV files, which may played directly with nearly any Linux or Windows player, or written to a Compact Disc in the CD-DA standard format. One disadvantage with this is that no "meta-data" or tags with Artist, Title, etc are carried along and, since you are creating your own CD, there is no matching information in the online cddb or freedb databases.
To overcome this, you might consider the lossless flac format for storage on your computer. To ease conversion of WAV files, I create a script containing the desired meta-data and encoding instructions. All this metadata needs to be manually added since it does not exist anywhere that I have found for my vinyl records. A sample entry from one of my scripts is:
The first line invokes the flac executable which encodes the file with default parameters. I have found that output files tend to be from 50 to 70 percent of the original WAV file depending on the music characteristics. The second line (and continuations) add the meta-data fields with the specified parameters using the metaflac utility.
For lossy formats where I am more concerned with file size than purity of sound, I prefer the Ogg-Vorbis encoding method. The Ubuntu distribution supports this format, with no more than an access to the repository for the "vorbis-tools" package. Some portable audio players play these files, encluding the NeurosAudio and various Cowan/iAudio players such as the tiny 'G3' player I use. Ogg-Vorbis encoded files at the Q6 level seem to be roughly 15% of the WAV file size for this type of music. Here is the sample encoding sequence for the above track for Ogg:
If you must encode in the MP3 format for players that cannot handle flac or Ogg-Vorbis, then the lame program may be used. It is available from various locations including the Ubuntu multiverse area. While many people can listen to 128 kilobit-per-second (or slower) MP3 files, I find them muffled and prefer 224 kbps or faster files to obtain adequate quality. 128 kbps encoding (set with lame's "-b" option) produces files that are roughly 9 percent of the original WAV file, while files coded at 224 kbps come in at about 17% of the original size. The lame encoding fragment corresponding to the above file is:
That's all there is to the process. Enjoy recovering your music, and always remember to back up your work .. frequently.