Ira Goldklang's TRS-80 Revived Site

TRS-80 Revived Site by Ira Goldklang's is an archive of everything related to the Tandy Radio Shack TRS-80 microcomputer lines. Site contains emulators, programs, manuals, books, patches, games, hints, discussions, questions, forums, and tons more.

TRS-80 Emulation: Disk Conversion Instructions

by @ 7:01 pm on February 20, 2009.
TRS-80 Disk Conversion Instructions

What is this page / How do I convert a TRS-80 Disk for use in an Emulator?
This page contains the disparate instructions and hints which have been compiled over the years with regard to converting disks between a PC and a TRS-80.

The bare basics are that modern day PC’s have three failings when it comes to converting TRS-80 disks:

1) They do not have the ability to read single density disks;
2) They do not offer direct hardware addressing; and
3) They do not (for the most part) even have a BIOS setting to allow you to hook up a 5.25″ drive

With this, many people have developed work-arounds, which can include using a real TRS-80 or buying a special adapter card.

While this page, which is organized poorly if at all, should be consulted in detail for anyone with questions about TRS-80 disks, real and virtual, the following is a quick flowchart on how you can convert your current disks:

                 Are disks you are trying to read for a TRS-80 Model I, III, or 4?
YES


NO
Stop here — the rest will not work for you. This will only work on Model I, III, or 4 disks.
                 Do you have a 5.25″ drive installed in a PC?
YES


NO
You can try to buy one on eBay, or send the Disks to me for conversion (there is NO charge for this).
                 Are you running DOS, Windows ’98, Windows ME or an operating system on the PC which will allow for direct access to hardware (Note: NT, XP, 2003, and VISTA are a big NO).
YES


NO
You can set up your system to dual boot into MSDOS (either thru your OS or by purchasing System Commander). No matter what you do, though, you need to be able to boot directly into MSDOS or *NIX (but any discussion of *NIX is well beyond me).
                
a) Download READDISK;
b) Unzip READDISK;
c) Review the Documentation for READDISK;
d) Boot into MSDOS;
e) Go to the directory where you unzipped READDISK;
f) Put the TRS-80 disk in your 5.25″ drive;
g) Enter “READDISK A: DISKFILE” (no quotes) or the appropriate command for your disk.

                 Did the above step generate any errors?
YES


NO
Success … swap to your next TRS-80 disk and repeat that last step until you finish! Congrats!
                 Ugh. The error could be because your disks are bad, your disks are not really Model I, III, or 4, your disks are copy protected, your disks are damaged, or your disks are single density or CP/M. However, since READDISK has failed (and you might want to try a few other disks to see if those read), you will need to either use a TRS-80 to try to copy them to another TRS-80 disk (in double density), buy a Catweasel card, or send the Disks to me for conversion (there is NO charge for this).

If you want to use a TRS-80, please see the very next item, entitled “How can I read a Model I Disk?”

If you intend to get a Catweasel card, the your life will be a lot easier (although this is a far more costly venture than sending the disks to me for reading). In this case, hook up the Catweasel card to your 5.25″ drive, download Tim Mann’s Catweasel Utilities, unzip, go into DOS, and convert to your hearts content. The Catweasel can read Single Density, Double Density, CP/M, and copy protected disks.

How can I read a Model I Disk?

Background:

A USENET discussion (in response to my questions) produced the following. Since I want to ensure that proper credit is accorded, first comes their name, then their part:

(Bill Vermillion bv@wjv.com)
The basic difference between SD and DD is that the former includes a clock bit between ever data bit. DD derives the clock from the data. The difference between the two as far as the computer goes is being able to have a much finer clock resolution.
HD gets it’s increased density by using smaller particles. As with most things which get smaller, the smaller they are the stronger they have to be so as not to deform. The physically stronger particles are also less resistant to magentization so we have to use a higher current to magnetize them. This is called the coercivity. [Think of it as being able to coerce someone to do something - the more resistant they are to change the more force you have to apply. Sounds like some computer people I know!]

Mark P. Fishman (mfishman@ll.mit.edu)
The floppy controller that is part of the Adaptec 1522 SCSI controller (ISA, non-bus-mastering, relatively cheap but good) can read/write/format FM (Single Density) floppies, including LDOS-format SD floppies. TRSDOS2.3 directory tracks CANNOT be handled on these because of the DAM, but once converted to LDOS (or Model III DOSPLUS) format they work fine. (Same problem as going from WD1771 to WD1793, but even less flexible I think.)
Possibly the floppy controller on an Adaptec 1542 (ISA, bus mastering, seomwhat pricier) also works; I haven’t tested.

Amardeep S Chana (amardeep_chana@yahoo.com)
You can still find some Acculogic ISApport SCSI adapters which used the SMC FDC37C65 on eBay from time to time and they go for about $10 or less. These won’t do single density on a 1.2MB HD drive, though. Only 360K DD.
The Adaptec 1542 and 1522 used the NS8473 controller. eBay might be a cheap source for these as well. I’ve seen them listed from time to time but didn’t pay too much attention since they are only 5MB/S (i.e. they should go cheap).
Don’t worry about them interfering with your existing SCSI subsystem, which is probably PCI based and will have much different I/O address and IRQ mappings. Don’t forget to disable the motherboard’s FDC.
Also, don’t discount the possibility that your motherboard controller can support single density. Boot up LSDOS on a Model 4 emulator and format a single density real floppy disk. If it verifies okay, then you are all set.
If you want to read TRSDOS 2.x or NEWDOS/80 1.x diskettes you need a real Model I. Lacking that use a Model III/4 and CONVERT them first. Then an FM capable PC should be able to read them.

Louis Schulman (louiss@gate.net)d
In my experience, any Western Digital MFM/floppy or RLL/floppy or stand-alone controller will work fine with single density. Model numbers are something like 1003, 1002, 1007, etc. These are available in abundance from any suplus source, including flea markets. The last one I got cost a buck. You can probably buy a whole PC-clone with one of these cards for $5.
I have mine in a PC XT-286 with a 360K drive. With a Central Point Option card, I can even copy TRS-DOS 2.3 disks

Method 1:

Niels Horn of Rio de Janeiro, Brasil has developed a way to use a Model III or IV to enable the transfer of Model I disks!!
1. Boot Model III/IV with NewDos/80 v2.0
2. Format an 80-track disk in :1 to Single Sided, Single Density using
TI=A,TD=A,TC=80,SPT=10,TSR=0,GPL=2,DDSL=40,DDGA=2
3. Copy the Model I files to the 80-track SSSD disk
4. Boot Model III/IV with LDOS v6.x
5. Format a 40-track DSDD disk
6. Copy the files from the 80-track SSSD disk to the 40-track DSDD disk
7. Place destination disk from step 6 into PC and READDISK it
Why all this hastle? Well, neither NewDos/80 v2.0 nor Single Density disks can be read in a PC drive.
Since a PC can EASILY read LDOS disks, you need a uniform format between NEWDOS/80 and LDOS … Single Density!!!
The 80 Track is not vital but you will have a LARGE chore trying to copy a Double Density disk onto a 40 track single density disk.

Method 2:

One terrific user has come up with his own way to use READDISK with Model I disks. The catch, and there always is one, is that you must have a working (i) Model I with a Percom Doubler or a (ii) Model III. If you do, here are the instructions:
1. Set the NewDos/80 v2.0 PDRIVE setting FOR THE SOURCE DISK as follows:
TI=AL,TD=A,TC=35,SPT=10,TSR=3,GPL=2,DDSL=17,DDGA=2 (80 track drive)

or

TI=A,TD=A,TC=35,SPT=10,TSR=3,GPL=2,DDSL=17,DDGA=2 (35 or 40 track drive)
2. If you are trying this on a Model III, you may need to set BN=Y under the SYSTEM if the disk was written with NewDos/80 v2.0 on the Model I
3. Set the NewDos/80 v2.0 PDRIVE setting FOR THE DESTINATION DISK as follows:
TI=C,TD=G,TC=80,SPT=36,TSR=0,GPL=8,DDSL=35,DDGA=2 (Must be 80 track drive)
4. Copy from THE SOURCE to the DESTINATION (COPY X Y,,cbf)
5. This will result in a 80 track DS, DD disk which READDISK can handle with:
        READDISK /2 /n:80 /8 a: filename

Method 3:

Use Transfer (by MichTron).
Use of this program requires a working Model I and 5.25" PC disks formatted to single-sided single-density by the TRANSFER program.
Will move files from a Model I to a PC via the PC formatted disks.
The package consists of a Multidos system with three programs on it, with the PCI/CMD program for the Model I.

You read the diskette on the computer and then, using the menu, transfer the files to the boot disk.
TRANSFER requires a two or three drive computer. Single drive systems won't work.

Method 4 by Tim Mann

One way is to transfer data over the TRS-80's serial port or printer port. That's probably the best way if you have a Model I, because a stock Model I can read and write only single density, but many PCs cannot deal with single density. Jeff Vavasour's Model I emulator includes instructions on how to do this. One user has written some notes on how to do this ...
A faster and more convenient way, if you can get it to work, is to read the disks in a PC with a 5" floppy drive. Under MS-DOS or MS Windows, try Matthew Reed's freeware READDISK v2.1. See http://www.trs-80emulators.com/readdisk_doc.html.
Alternatively, if you have problems with READDISK or you are using Linux, you can copy the disks with an emulator, as follows.
1. Get a TRS-80 emulator that supports both .DSK files and real floppy drives. Read the emulator's instructions and get it running.
2. Find a PC with a real 5" floppy drive attached. In theory, a 40-track DD drive is best if your TRS-80 had 40-track or 35-track drives, but you can use 80-track HD drives too. (On a PC, 40-track DD drives are usually called 180KB or 360KB drives, depending on whether they are single or double sided.) The trouble with this theory is that DD drives may not work with some emulators. I believe that xtrs should work if you follow the new instructions in the version 1.9 man page, but this is untested; and I have no solid information about other emulators.
3. Configure the emulator with an LDOS or other operating system .DSK file as drive :0, a new, empty .DSK file as drive :1, and the real drive as drive :2. If you are using a Model I emulator with LDOS, note that Model I LDOS comes on two .DSK files, so configure the emulator with the second one (LDOSXTRA.DSK) as drive :3.
4. Boot the emulated machine. Model I LDOS requires an extra driver to deal with double density, so if you are using it, type FDUBL to the emulator after booting.
5. Put the floppy into the real drive and copy it to the emulated drive (.DSK) file. If you are using LDOS 5.3.1, the command is QFB :2 :1. On LS-DOS 6.3.1, the command is DISKCOPY :2 :1. Both those commands format the floppy automatically. On non-LDOS systems, the command might be COPY or BACKUP, and you might need to give extra command line options and/or to FORMAT :1 first; I can't help on that. You might also be able to copy disks by running SuperUtility or the like under the emulator, although programs like SuperUtility have problems running on some emulators.

NOTE (Added July 8, 2006)

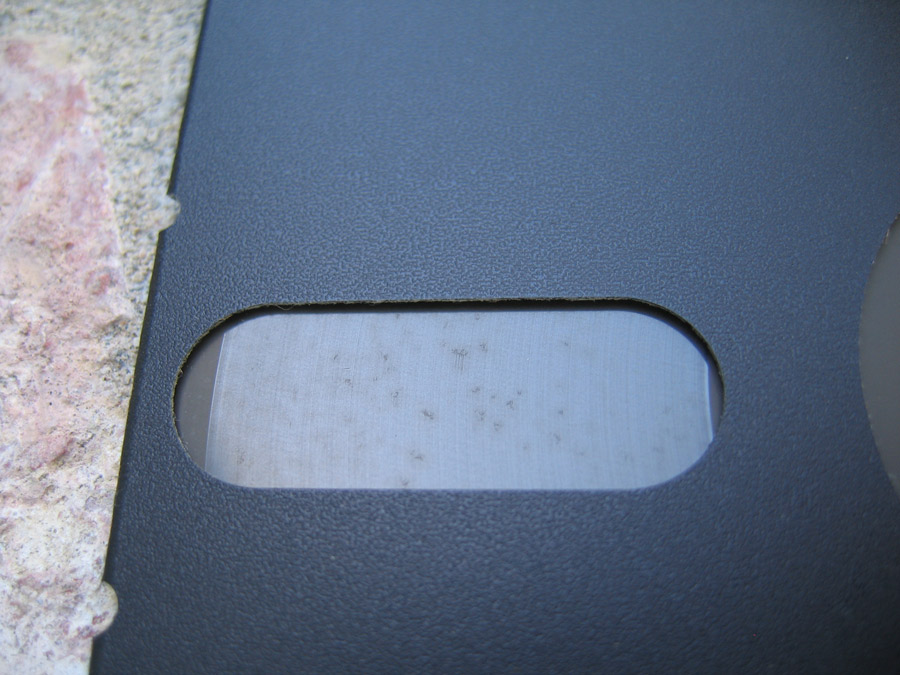
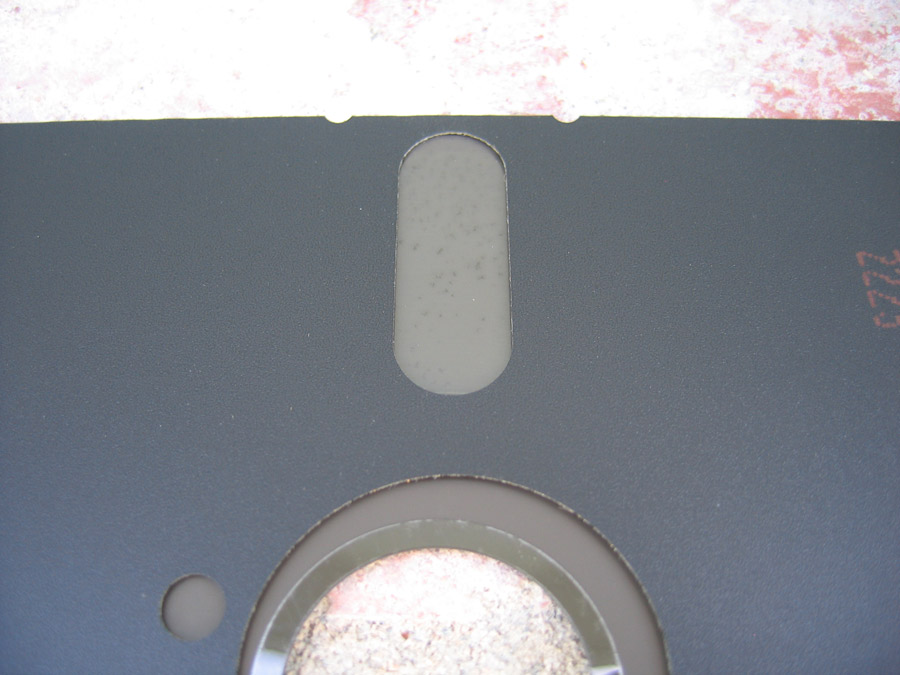
Before putting a disk in your drive, make sure to inspect it. Improperly stored disks will degrade, and will shred in your drive. Inserting one of these disks in your drive will not only produce a disheartening noise, but will likely coat your read/write head with oxide, requiring you to clean the heads. Here are some pictures I took of some of these improperly stored or otherwise decayed disks. Click on the images for more detail:

How can I convert .DSK files to real TRS-80 floppy disks?
[Tim Mann] There are at least five possibilities:
(A)    One way would be to transfer data from your newer computer to a real TRS-80 through its serial port or printer port. That may be the only way if you have a Model I, because a stock Model I can read and write only single density, but many PCs cannot deal with single density. However, I don't know of any software for transferring data to the TRS-80 Model I through a serial or parallel port. (Kermit did exist for the Model 4, and you may be able to find XMODEM or the like).
(B) A faster and more convenient way, if you can get it to work, is to write the disks in a PC with a 5.25-inch floppy drive. If you have Linux on your PC and your disk is a standard double-density format (40 or 80 tracks, 1 or 2 sides), you can use the programs trsfmt and diskdmp by Tony Duell, available from http://www.tim-mann.org/trs80/trsdsk.tar.gz. See the documentation included in the tar file. If you don't understand what to do with .tar.gz files, see the next method instead.
(C) A more general way to write TRS-80 floppy disks in a PC with a 5.25-inch floppy drive is to use an emulator. Suitable emulators are available for both Linux and DOS or Windows. Here is a procedure you can follow:
1.   Get a TRS-80 emulator that supports both .DSK files and real floppy drives. Please don't say, "But I don't need an emulator, I have a real machine!" You need an emulator to run this procedure, and they are nice to have anyway, so get one.
2.   Get the files working for you in the emulator as .DSK files. Read the instructions for the emulator to find out how to do this.
3.   Find a PC with a real 5.25-inch floppy drive attached. In theory, a 40-track DD drive is best if your TRS-80 had 40-track or 35-track drives, but you can use 80-track HD drives too. (On a PC, 40-track DD drives are usually called 180KB or 360KB drives, depending on whether they are single or double sided.) The trouble with this theory is that DD drives may not work with some emulators, and if your DD drive is a pullout from a TRS-80, you may have difficulty cabling and jumpering it correctly for a PC.
4.   Bulk-erase a 5.25-inch floppy, preferably using an AC bulk tape eraser as sold by Radio Shack and others. You may be able to omit this step if you are using a 40-track drive, but it's a good idea to do it anyway. It is best to use floppies that are rated for double density or quad density, not high density. High density floppies may work in a pinch, but don't expect double density data to stay stable on them for a long time.
5.   Configure the emulator with an LDOS or other operating system .DSK file as drive :0, the .DSK file you want to convert as drive :1, and the real drive as drive :2. If you are using a Model I emulator with LDOS, note that Model I LDOS comes on two .DSK files, so configure the emulator with the second one (LDOSXTRA.DSK) as drive :3. Note: never try to use drive :3 for a double-sided disk (read or virtual) on the Model I; a limitation of the Model I hardware (which the emulators have no choice but to emulate faithfully) makes this fail to work.
6.   Boot the emulated machine. Model I LDOS requires an extra driver to deal with double density, so if you are using it, type FDUBL to the emulator after booting.
7.   Put the floppy into the real drive and copy the emulated drive (.DSK) file to it. If you are using LDOS 5.3.1, the command is QFB :1 :2. On LS-DOS 6.3.1, the command is DISKCOPY :1 :2. Both those commands format the floppy automatically.
The above instructions assume that the disk is in a format that can be copied by LDOS. For TRSDOS 1.3 and NEWDOS/80 disks that LDOS doesn't understand, you can get a TRSDOS 1.3 or NEWDOS/80 image from http://www.trs-80.com, use that as the operating system in the above procedure, and use appropriate TRSDOS 1.3 or NEWDOS/80 commands to copy the disk.
(D) For copy-protected disks (or normal disks, actually), you can also try running one of the many TRS-80 copy utilities on an emulator, copying from a .DSK image to a real PC disk drive. This will work if the copy utility is compatible with the emulator and the physical disk format can be written by your PC floppy controller. The procedure is generally similar to the instructions outlined above, but the details depend on which copy utility you're using. I've had good results with SuperUtility (available from http://www.tim-mann.org/misosys.html) running under xtrs, and I think it runs well under David Keil's emulator too. If you are using Model I SuperUtility, be sure to set the emulator to emulate either a Tandy or Percom double density adapter, not both at once. The CopyCat program available from David Keil's web site is also handy, as it only copies disks and is much more automated than SuperUtility. CopyCat works well under David Keil's emulator and under xtrs version 4.9 or later. Other copy utilities that are sometimes useful include Trakcess and HyperZap.
(E) Another method is to buy a Catweasel universal floppy controller card and copy the disks with it using the dmk2cw program from my Catweasel Tools. This method is good for disk formats that your PC can't write.

How can I get individual files on and/or off a .DSK?
Most of the TRS-80 emulators have programs for doing this. Read the instructions for your emulator to find out how to use them. Sometimes the program runs on the emulated Z-80 (a /CMD file); other times it runs on the host operating system (an .EXE file).

Getting Files Off of a DSK:

Under Jeff Vavasour's Model I Emulator, the relevant program is VREAD.EXE. Under Jeff's Model III/4 emulator, it is EXPORT/CMD. Under Matthew Reed's Model I/III emulator, the program is TRSREAD.EXE and is available only with the registered version. Under xtrs, the program is called EXPORT/CMD (not the same program as Jeff's).

Getting Files Onto a DSK:

Under Jeff Vavasour's Model I Emulator, the relevant program is VWRITE.EXE. Under Jeff's Model III/4 emulator, it is IMPORT/CMD. Under Matthew Reed's Model I/III emulator, the program is TRSWRITE.EXE and is available only with the registered version. Under xtrs, the program is called IMPORT/CMD (not the same program as Jeff's).

Are there any guidelines for scanning?
This is actually here because many kind people have asked if I wanted them to scan certain items in their collection. To avoid the various searching for prior sent emails, the following is a list of pointers and requests when scanning for the site:

Scanning Modes:

  • Color pages should be scanned in True Color

  • Non-Color pages should be scanned in full grayscale ... NEVER in "BITMAP" or "Black and White"

  • Images should be scanned in at LEAST 400 DPI

  • Images should be saved as non-compressed TIFF's. NEVER as JPEG's.

Processing:

  • Make sure the text is more or less straight ... if its at a sharp angle, please re-scan the page.

  • Make sure each page size is the same dimension. Note: Rotating a scan in an image editor, rather than doing the re-scan, will change the scanned page dimensions.

  • Trim off any unintended dots at the margins. Jagged edges, overscans, etc., all take up space in addition to being useless. If clear those stray items, the pages will look nicer AND will take less space.

Note: If you cannot do the "Processing" part, then I will do it for you, but will need the TIFF's. I can set up a temporary FTP site for you to upload to if you contact me.

Leave a Reply

[Ira Goldklang's TRS-80 Revived Site is proudly powered by WordPress.]